
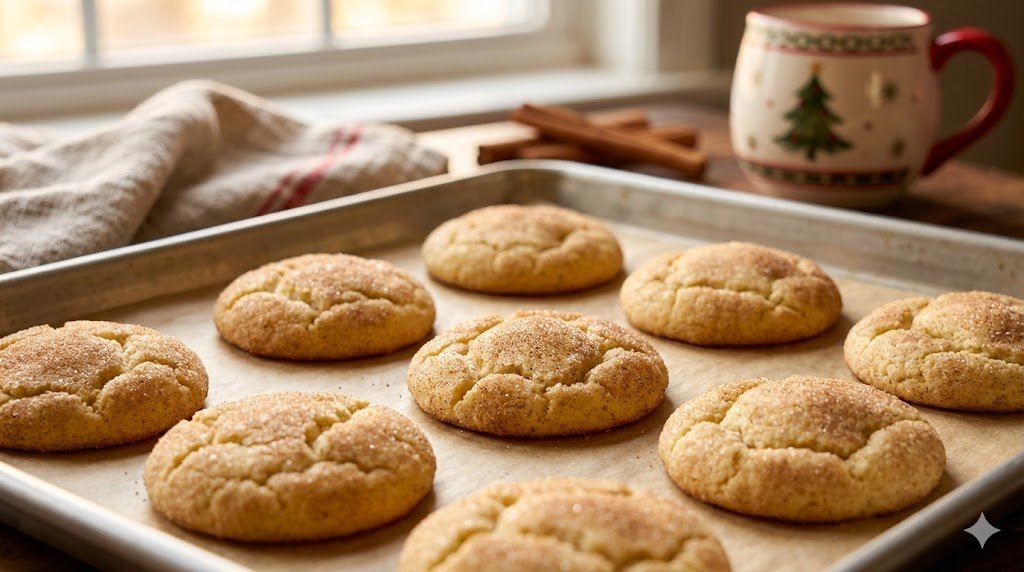
Let’s be honest. We all have that one cookie recipe that brings us straight back to childhood. For me, it’s the Snickerdoodle. It’s not just a sugar cookie rolling around in cinnamon; it’s a pillowy, chewy, tangy masterpiece that deserves way more respect than it gets. You bite into it, and you get that slight resistance from the crinkly top, followed immediately by a soft, melt-in-your-mouth center. 🍪
But here is the kicker: if you make them without cream of tartar, you are basically just eating cinnamon toast in cookie form. And frankly? That’s boring.
I used to think cream of tartar was just a fancy ingredient my grandma kept in the back of the cupboard for show. I tried skipping it once. Big mistake. The cookies came out flat, crispy, and sadly lacking that signature “zing.” Today, we are giving this unsung hero its moment in the spotlight. We are going to bake the perfect Snickerdoodles with Cream of Tartar, and I promise you, you will never go back to the basic version. Let’s get baking. 🥣
The Elephant in the Room: What is Cream of Tartar?
You might ask, “What on earth is this white powder, and why do I need to buy a whole jar for one teaspoon?”
Here is the science (don’t worry, I’ll keep it brief). Cream of tartar is actually an acid—specifically, potassium bitartrate. It’s a byproduct of wine making, which is pretty cool if you ask me. In this recipe, it acts as the Robin to Baking Soda’s Batman. 🦇
When you mix the acidic cream of tartar with the alkaline baking soda, they react. This reaction creates carbon dioxide bubbles. These bubbles give the cookie that incredible lift and puffiness. But more importantly, the acid prevents the sugar in the dough from crystallizing. That means your cookie stays soft and chewy rather than turning into a crunchy rock. Plus, it provides that slight tang that distinguishes a true Snickerdoodle from a basic sugar cookie. Science is delicious, isn’t it? 🧪
Why You Can’t Just Use Baking Powder
I see this question all the time in baking forums. “Can’t I just swap it for baking powder?”
Technically? Yes.
Should you? Absolutely not.
Baking powder is just baking soda mixed with an acid (usually cornstarch or cream of tartar) already. But pre-mixed baking powder doesn’t give you the same level of acidity. You lose the tang. You lose the specific chewiness. You end up with a cakey, generic cookie.
If you want the real deal—the kind that makes people close their eyes and sigh when they take a bite—you need to buy the jar. It costs like three dollars. Just do it. 🛒
The Ingredient Lineup: Pantry Raid
We aren’t using anything wild here. You likely have most of this stuff sitting in your kitchen right now.
The Wet Team
- 1 cup (2 sticks) Unsalted Butter, softened.
- My take: Leave the butter on the counter for an hour. If you microwave it and it melts, your cookies will spread into puddles. Soft butter equals fluffy cookies. 🧈
- 1 ½ cups Granulated White Sugar.
- 2 Large Eggs (Room temperature helps them mix better).
- 2 tsp Vanilla Extract. (Measure this with your heart; I always add a splash more).
The Dry Team
- 2 ¾ cups All-Purpose Flour.
- Note: Spoon and level your flour! If you scoop directly with the cup, you pack it down, add too much flour, and get dry cookies.
- 2 tsp Cream of Tartar.
- 1 tsp Baking Soda.
- ½ tsp Salt.
The Cinnamon-Sugar Coating
- 3 tbsp Granulated White Sugar.
- 3 tsp Ground Cinnamon.
Step-by-Step Instructions: The Fluff Method
Follow these steps exactly. Baking is chemistry, but it’s also about feeling the dough.
Step 1: The Creaming Phase
Grab your stand mixer or a hand mixer. Throw the softened butter and 1 ½ cups of sugar into the bowl.
Beat them on medium-high speed.
Time it. Do this for at least 3 to 4 minutes.
You want the mixture to look pale yellow and fluffy. We are mechanically forcing air into the butter. This air expands in the oven. If you rush this step, you get dense cookies. Don’t be lazy here! ⏱️
Step 2: Add the Liquids
Crack in the eggs one at a time. Beat well after each addition.
Pour in the vanilla extract.
Scrape down the sides of the bowl with a rubber spatula. You don’t want any unmixed butter hiding at the bottom.
Step 3: The Dry Mix
In a separate medium bowl, whisk together the flour, cream of tartar, baking soda, and salt.
Turn your mixer to low speed.
Slowly dump the dry ingredients into the wet mixture.
Stop mixing the second you see the flour disappear. Overmixing develops gluten, which makes cookies tough. We want tender clouds, not bread.
Step 4: The Chill (Optional but Recommended)
If your kitchen is hot or your butter got too soft, cover the bowl and chill the dough for 30 minutes. Cold dough spreads less. If you like a thicker cookie, chill it. If you like a thinner, crispier cookie, bake immediately. I usually can’t wait, so I bake right away. 🤷♂️
Step 5: The Roll
Preheat your oven to 375°F (190°C). Line baking sheets with parchment paper.
Mix the 3 tbsp sugar and 3 tsp cinnamon in a small bowl.
Scoop the dough into balls (about 1.5 tablespoons each).
Roll the balls generously in the cinnamon sugar. Coat them completely. This is the fun part.
Step 6: The Bake
Place the balls on the baking sheet, spaced 2 inches apart.
Bake for 8 to 10 minutes.
Watch them like a hawk.
- Visual Cue: The edges should look set, but the centers will still look puffy and slightly underbaked.Take them out. They continue cooking on the hot pan for a few minutes. If you bake them until they look firm in the oven, they will be hard as rocks once they cool.
Nutritional Information (Per Cookie)
Let’s check the stats. This recipe yields about 24 cookies.
| Nutrient | Amount |
| Calories | ~160 kcal |
| Fat | 7g |
| Carbs | 22g |
| Sugar | 14g |
| Protein | 2g |
FYI: It’s a cookie. It has sugar and butter. Enjoy it and eat a salad tomorrow. 🥗
Troubleshooting: Why Did My Cookies Flop?
I’ve had my fair share of baking disasters. Here is how to avoid the common pitfalls.
“They are flat as pancakes!”
You probably melted the butter or your baking soda is old.
- The Fix: Make sure your butter is room temp, not liquid. Also, check the expiration date on your leavening agents. They lose potency over time.
“They are hard and crunchy!”
You overbaked them.
- The Fix: Pull them out a minute earlier next time. They should look deceptively underdone when you remove the pan. Trust the carry-over cooking.
“They didn’t crack on top!”
The oven wasn’t hot enough, or you used too much flour.
- The Fix: Double-check your oven temp with a thermometer. Also, remember to fluff your flour before scooping it.
Variations: Spice It Up
Once you master the classic, you can get creative. Snickerdoodles are a great canvas for other flavors.
- Pumpkin Spice: Swap half the cinnamon in the coating for pumpkin pie spice.
- Chai Doodle: Add cardamom, ginger, and cloves to the rolling sugar.
- Stuffed: Wrap the dough around a small piece of caramel or a dab of cream cheese before rolling. (This is dangerous territory, proceeds with caution). 😋
Storage and Freezing
These cookies stay soft for days—if you store them right.
- Room Temp: Store in an airtight container for up to 5 days.
- The Bread Trick: Throw a slice of white bread into the container with the cookies. The cookies absorb the moisture from the bread and stay soft longer. The bread turns into a crouton. It’s magic.
- Freezing:
- Dough: Freeze the raw dough balls (without sugar coating). When you want a cookie, roll in sugar and bake—just add 2 minutes to the bake time.
- Baked: Freeze fully cooled cookies for up to 3 months. Thaw on the counter.
Why This Recipe Wins
There are a million cookie recipes on the internet. But this one? It respects the chemistry. It doesn’t try to cut corners by using baking powder. It leans into the acidity of the cream of tartar to create that unique, nostalgic flavor profile.
Ever wondered why store-bought Snickerdoodles taste like cardboard? It’s because they prioritize shelf life over texture. By making these at home, you control the chew. You control the tang.
Conclusion: Use the Powder
There you have it. You now possess the blueprint for the ultimate Snickerdoodles with Cream of Tartar.
It’s a simple recipe, but the devil is in the details. Don’t skip the creaming step. Don’t overbake. And for the love of all things holy, buy the cream of tartar.
So, preheat that oven. grab that cinnamon. And prepare to be the most popular person at the bake sale (or just in your own living room).
Happy baking! 🎯