
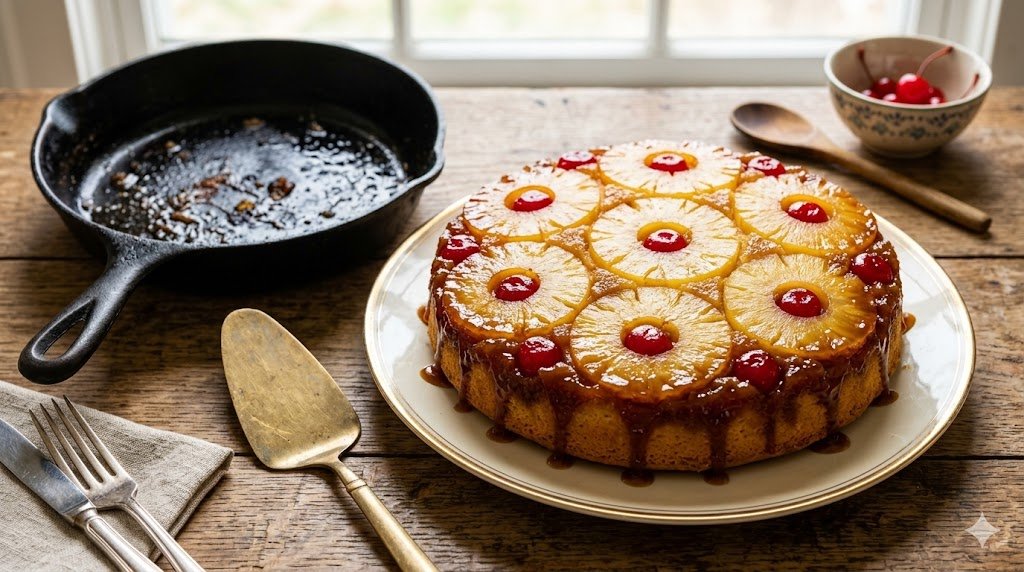
Do you ever crave a dessert that looks like a literal masterpiece but requires zero actual frosting skills? I completely understand that specific baking mood. Let me introduce you to the glorious [ Pineapple Upside-Down Cake ], an absolute titan of classic American comfort food. 🍍 I completely destroyed my first few attempts by cementing the fruit to the bottom of the pan, but I finally cracked the code for the perfect release. You get an incredibly moist vanilla crumb soaking up a rich, buttery caramel topping. 🤤 Why stress over piping complicated buttercream when gravity does all the hard decorating work for you?
If you want to attract hungry visitors to your new website, this recipe provides the absolute perfect visual hook. 📸 American audiences hold a massive soft spot for nostalgic, retro desserts. The sharp contrast between the bright yellow fruit rings and the sticky brown sugar glaze catches the eye instantly. You can easily design stunning, ultra-realistic Pinterest posters using just a single slice of this cake. ✨ Visual platforms reward bright, highly textured food photography, and this sticky treat delivers exactly that.
Sourcing Your Sweet Ingredients
Great baking requires the right ingredients and a little bit of food science. 🛒 You cannot just throw random fruits into a pan and expect a beautiful result. Let me save you from the frustrating mistakes I made early on.
The Great Pineapple Debate
You might feel tempted to buy a fresh, expensive pineapple for this recipe. IMO, canned pineapple actually works much better here. 🍍 Fresh pineapple contains an active enzyme called bromelain. This pesky enzyme breaks down proteins rapidly and sometimes turns your beautiful cake batter into a soggy, weirdly textured mess.
Canned pineapple rings undergo pasteurization, which kills that enzyme completely. Plus, the canning process gives you perfectly uniform rings that make your final presentation look incredibly professional. 🔪 Save the fresh pineapple for your morning smoothies and grab the heavy syrup tin for your baking. Your stress levels will thank you later.
The Cherry Rule
You simply cannot bake this classic dessert without maraschino cherries. 🍒 I know some culinary purists turn their noses up at them, but they provide that necessary pop of bright ruby red. They nestle perfectly inside the yellow rings, creating that iconic retro aesthetic everyone loves.
Just make sure you pat the cherries completely dry with a paper towel before you place them in the pan. 🧻 If you skip this crucial step, the red juice bleeds into the hot caramel. You will end up with a muddy, weird pink puddle instead of a pristine golden glaze.
Choosing the Right Pan
Let’s talk about your baking equipment. You can technically bake this in a standard round cake pan, but I strongly advocate for a well-seasoned cast-iron skillet. 🍳 Cast iron conducts heat flawlessly, creating an aggressive, bubbling boil for the butter and brown sugar.
This intense, even heat develops a deeply caramelized, slightly crispy crust around the edges of the fruit. Have you ever eaten a cake slice with a perfectly crunchy caramel edge? It literally changes your entire perspective on baking. 🎯 A glass dish simply cannot replicate that heavy sear.
The Official [ Pineapple Upside-Down Cake ] Recipe
Let’s fire up the oven and create some sticky magic. 🧑🍳 I keep my ingredient list traditional, focusing on maximizing that buttery vanilla flavor to balance the acidic fruit.
The Caramel Topping:
- 1/4 cup unsalted butter (half a stick) 🧈
- 3/4 cup dark brown sugar, tightly packed 🤎
- 1 can (20 oz) pineapple slices, drained perfectly 🍍
- 1 jar maraschino cherries, stems removed and dried 🍒
The Vanilla Cake Batter:
- 1.5 cups all-purpose flour 🌾
- 1.5 teaspoons baking powder 🥄
- 1/4 teaspoon sea salt 🧂
- 1/2 cup unsalted butter, softened to room temperature 🧈
- 3/4 cup granulated white sugar 🍚
- 2 large eggs, room temperature 🥚
- 1 teaspoon pure vanilla extract 🌼
- 1/2 cup whole milk, room temperature 🥛
- 1/4 cup pineapple juice (reserved from the can) 🧃
Nutritional Information (Per Serving – Serves 8):
- Calories: 410 🔥
- Protein: 4g 💪
- Fat: 18g 🥑
- Carbohydrates: 58g 🍞
- Fiber: 1g 🌾
- Sugar: 42g 🍬
Step-by-Step: Baking the Perfect Cake
People often feel intimidated by the upside-down process. Do not panic! 😅 The actual batter comes together in minutes. Follow these exact steps to achieve that perfect, fluffy texture.
- Prep the oven: Preheat your oven to 350°F (175°C). Place your oven rack in the dead center position. 🔥
- Create the caramel base: Melt the 1/4 cup of butter directly inside your 9-inch cast-iron skillet over medium-low heat. 🍳 Once it melts, sprinkle the dark brown sugar evenly across the butter. Whisk them together for exactly one minute until they form a thick, bubbling paste. Remove the skillet from the heat immediately.
- Design the fruit layer: Carefully arrange your dried pineapple rings on top of the hot brown sugar mixture. 🍍 Place one ring right in the center, and arrange the rest around the edges. Pop one dried cherry into the center of every single pineapple ring.
- Mix the dry ingredients: In a medium glass bowl, whisk the flour, baking powder, and salt together vigorously. 🥣 Set this bowl aside for a moment.
- Cream the butter and sugar: In a large mixing bowl, beat the softened butter and the white sugar together on high speed. 🌪️ You want this mixture to look incredibly pale and fluffy. This usually takes about three full minutes.
- Add the wet ingredients: Beat the room-temperature eggs into the butter mixture one at a time. 🥚 Pour in the vanilla extract and mix until everything looks smooth and cohesive.
- Finish the batter: Add half of your dry flour mixture to the bowl, beating on low speed. Pour in the whole milk and the reserved pineapple juice. 🥛 Finally, add the remaining flour mixture. Stop mixing the exact second the last streak of flour disappears! Overmixing creates a tough, rubbery cake.
- Bake the masterpiece: Gently spoon the thick cake batter over your arranged fruit in the skillet. 🥄 Use a silicone spatula to smooth the top perfectly flat. Bake the cake for 40 to 45 minutes. You know it finishes baking when a wooden toothpick inserted into the center pulls out completely clean.
Mastering the Dreaded Flip
The flipping process terrifies most amateur bakers. I hold my breath every single time I do this. 🫣 However, you will succeed if you follow one massive, unbreakable rule.
You absolutely must flip the cake while it remains hot. 🔥
When you pull the skillet out of the oven, set a timer for exactly ten minutes. ⏱️ This brief resting period allows the cake structure to firm up slightly. If you flip it immediately, the molten cake falls apart.
If you wait thirty minutes, the caramel turns into solid cement, permanently gluing your beautiful fruit to the pan. 🙂 Ten minutes hits the absolute sweet spot.
The Flipping Technique
Grab a large, flat serving platter. 🍽️ The platter must sit completely wider than your skillet. Place the platter upside down directly over the top of the skillet.
Put on heavy-duty oven mitts! Grab the skillet handle with one hand and press down firmly on the platter with your other hand. 🧤 Take a deep breath, and swiftly invert the whole setup in one confident, smooth motion.
Leave the skillet resting upside down on the platter for about sixty seconds. ⏳ This allows gravity to pull every last drop of that incredible butter caramel down into the vanilla sponge. Lift the skillet straight up slowly to reveal your stunning dessert!
How to Serve and Store Your Creation
You need to serve this dessert while it still radiates warmth. ♨️ The contrast between the hot, sticky caramel and a cold topping creates absolute culinary perfection.
FYI, I highly recommend dropping a massive scoop of vanilla bean ice cream right onto the hot slice. 🍦 The ice cream melts down the sides, mixing with the brown sugar glaze to create an unbelievable sauce. It pairs beautifully with a strong, black cup of coffee to balance out the intense sweetness. ☕
If you actually have leftovers, store them in an airtight container in the refrigerator for up to three days. 🧊 The fruit introduces a lot of moisture, so storing it on the counter invites mold very quickly. When you want another piece, just pop a slice in the microwave for fifteen seconds to revive that gooey caramel texture.
Final Thoughts on This Retro Classic
You truly need to invite this phenomenal [ Pineapple Upside-Down Cake ] into your permanent baking rotation. 🌟 The combination of tart pineapple, sweet cherries, and rich brown sugar creates an unforgettable flavor profile. You get massive visual impact for very little active kitchen time.
Why keep baking the same boring sheet cakes when you can blow everyone’s mind with this sticky, gorgeous centerpiece? 🚀 Grab a can of pineapple this weekend, fire up your oven, and conquer the flip! Your family and your website visitors will definitely thank you.