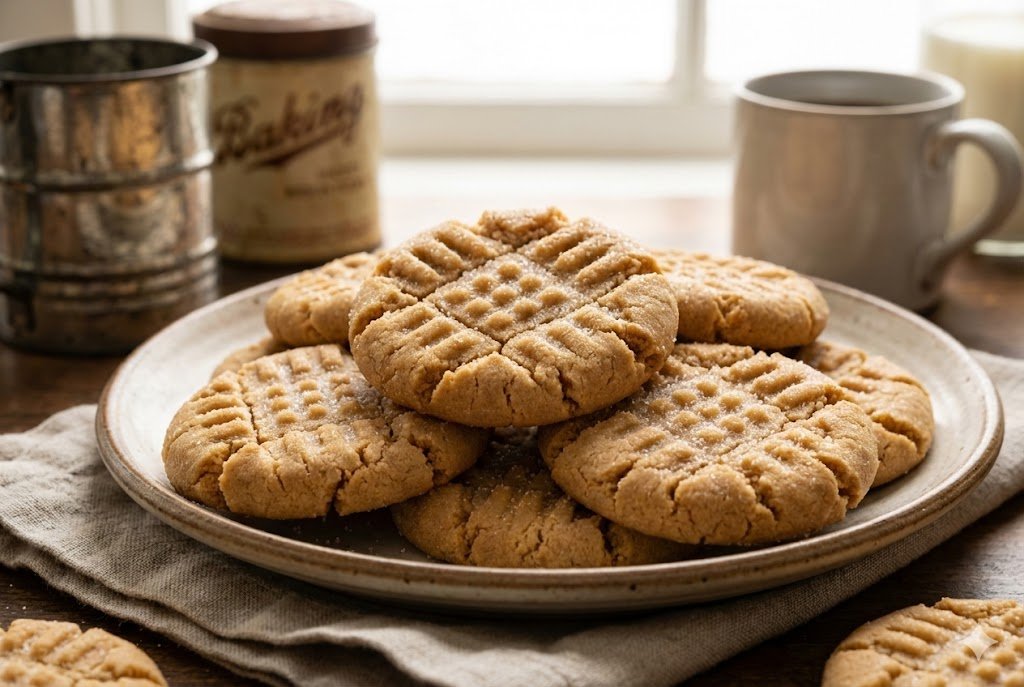
Let’s be real. You didn’t come here for a cookie that looks like a modern art masterpiece. You came here for the Classic Old-Fashioned Peanut Butter Cookie. You know the one. It has those little fork marks on top, it melts in your mouth, and it instantly transports you back to your grandma’s kitchen (or the school cafeteria, if we are being honest). 🥜
I have a deep, personal love for these cookies. They were the first thing I ever baked by myself. I remember standing on a chair, covered in flour, pressing that fork into the dough like I was performing a very serious surgical procedure. These cookies aren’t trying to be fancy. They don’t have browned butter or sea salt flakes. They are just pure, unadulterated peanut butter bliss. And sometimes, that is exactly what you need. 🍪
Ready to fill your kitchen with the best smell on earth? Let’s bake.
Why We Still Love the “Fork Mark” Cookie
You might ask, “Why do we smash them with a fork?” Is it just for looks? Actually, no.
Peanut butter dough is dense. Heavy. If you just roll it into a ball and throw it in the oven, it won’t spread. You will end up with a cooked outside and a raw, doughy baseball in the middle. The fork marks flatten the dough so it bakes evenly.
Plus, those little ridges catch the sugar crystals and create the perfect texture contrast. It’s a bit of culinary engineering that also happens to look adorable. IMO, a peanut butter cookie without the criss-cross just feels wrong. It’s like a burger without a bun. 🍔
The Ingredient Lineup: No Fancy Stuff Allowed
Put away the almond flour and the erythritol. We are doing this the old-school way. You likely have all of this in your pantry right now.
The Wet Team
- 1 cup (250g) Creamy Peanut Butter.
- Crucial Rule: Use a standard commercial brand like Jif or Skippy. Do not use natural peanut butter (the kind where the oil separates). Natural PB makes the cookies spread too much and turn greasy. Save the healthy stuff for your toast. 🚫
- ½ cup (113g) Unsalted Butter, softened.
- ½ cup (100g) White Granulated Sugar.
- ½ cup (100g) Brown Sugar, packed. (This adds the chewiness).
- 1 large Egg.
- 1 tsp Vanilla Extract.
The Dry Team
- 1 ¼ cups (160g) All-Purpose Flour.
- ½ tsp Baking Powder.
- ¾ tsp Baking Soda.
- ¼ tsp Salt.
Step-by-Step Instructions: The Criss-Cross Method
Follow these steps, and you will look like a baking pro. Keep your butter soft and your oven hot.
Step 1: The Creaming Phase
Preheat your oven to 375°F (190°C).
Grab a large bowl or a stand mixer. Toss in the butter, white sugar, and brown sugar.
Beat them together until fluffy. This usually takes about 2–3 minutes. You want the mixture to look pale and creamy, not gritty. Incorporating air now ensures a tender cookie later. 🌬️
Step 2: The Peanut Butter Injection
Add the peanut butter, egg, and vanilla.
Mix again until combined. The mixture will look like a delicious, light brown paste. (FYI, I usually sneak a taste here, but don’t tell the food safety police).
Step 3: The Dry Mix
In a separate small bowl, whisk the flour, baking powder, baking soda, and salt.
Slowly pour the dry ingredients into the wet mixture.
Mix on low speed just until the flour disappears. Stop mixing immediately. If you overmix, you develop gluten, and gluten makes tough cookies.1 We want tender, crumbly goodness.
Step 4: Roll and Sugar
Pour a little extra white sugar into a small bowl.
Scoop the dough into 1-inch balls. Roll them between your palms to make them smooth.
Roll each ball in the sugar bowl to coat it completely. This step gives you that sparkly, crunchy exterior. ✨
Step 5: The Smash
Place the balls on a baking sheet lined with parchment paper. Space them about 2 inches apart.
Take a fork. Press it gently into the top of the cookie.
Turn the fork 90 degrees and press again to make a criss-cross pattern.
- Tip: If the fork sticks to the dough, dip it in sugar before pressing.
Step 6: The Bake
Pop the tray into the oven. Bake for 9–11 minutes.
- The Check: You want the edges to look golden brown, but the centers should still look slightly soft. They firm up as they cool on the baking sheet. If you bake them until they look hard, you will break a tooth.
Nutritional Information (Per Cookie)
Let’s check the stats. This recipe yields about 24 cookies.
| Nutrient | Amount |
| Calories | ~140 kcal |
| Fat | 8g |
| Carbs | 16g |
| Protein | 3g |
| Sugar | 10g |
Note: These are treats. Eat two and be happy. 😊
Troubleshooting: Why Did My Cookies Spread?
I see this happen often. You pull the tray out, and instead of cookies, you have one giant, flat mega-cookie.
- The Culprit: Usually, your butter was too warm, or you used natural peanut butter.
- The Fix: Chill the dough balls in the fridge for 30 minutes before baking. Cold fat spreads slower. Also, double-check that PB label! Stick to the processed stuff for baking.
Variations: Mix It Up
Once you master the classic, you can get creative.
- Chocolate Dipped: Melt some semi-sweet chocolate chips. Dip half the cooled cookie into the chocolate. Peanut butter + chocolate = unparalleled joy. 🍫
- PB & J: After pressing the fork marks, use your thumb to make a small indent in the center. Fill it with a dab of strawberry jam before baking.
- Crunchy Mode: Use crunchy peanut butter instead of creamy for extra texture.
Storage: Keeping Them Fresh
These cookies hold up incredibly well.
- Room Temp: Store them in a cookie jar or airtight container for up to 1 week.
- Bread Trick: Toss a slice of white bread into the container with the cookies. The cookies absorb moisture from the bread and stay soft longer. Seriously, it works.
- Freezer: You can freeze the baked cookies for up to 3 months. Thaw them on the counter when a craving hits.
Why This Recipe “Works”
Simple recipes often hide complex chemistry. The balance of brown sugar (moisture) and white sugar (crisp edges) creates the perfect texture. The baking soda reacts with the acidity in the brown sugar to give them a little lift, while the dense peanut butter weighs them down.
It’s a perfect balancing act. And the result? A cookie that crumbles slightly when you bite it but melts into a creamy finish.
Conclusion: Grab a Glass of Milk
There you have it. You now possess the blueprint for the ultimate Classic Old-Fashioned Peanut Butter Cookie.
This recipe proves that you don’t need brown butter, sea salt, or expensive chocolate to make a world-class dessert. You just need a fork and a jar of Jif.
So, call your friends. Preheat that oven. And get ready to feel like a kid again. Just make sure you have plenty of cold milk on standby. You’re gonna need it. 🥛