

Let’s address the massive elephant standing in the modern bakery. Plain chocolate cakes bore me to absolute tears. 🍫 You spend hours meticulously baking, only to serve a one-dimensional dessert that practically puts everyone to sleep. You need something with actual character and serious flavor depth.
Enter the undeniable champion of American desserts: the [ Chocolate Peanut Butter Bundt Cake ]. I brought this exact recipe to a crowded neighborhood block party last month, and adults practically fought over the last slice. Ever wondered why this specific flavor combination holds such a massive grip on our tastebuds? The salty, creamy peanut butter perfectly cuts through the intense, dark cocoa notes. 🥜
You deserve a foolproof recipe that guarantees a moist, spectacular experience every single time. Let me show you how to bake this towering, indulgent masterpiece right in your own kitchen without tearing your hair out. ✨
Why You Need This [ Chocolate Peanut Butter Bundt Cake ] Right Now
Traditional layer cakes require the patience of a saint. You bake multiple round pans, you level the uneven domes, and you pray the thick frosting covers your obvious mistakes. 🙏 Bundt cakes completely eliminate that unnecessary kitchen stress. The intricate pan does all the heavy decorative lifting for you! You just pour the batter in, bake it, and flip it out onto a plate.
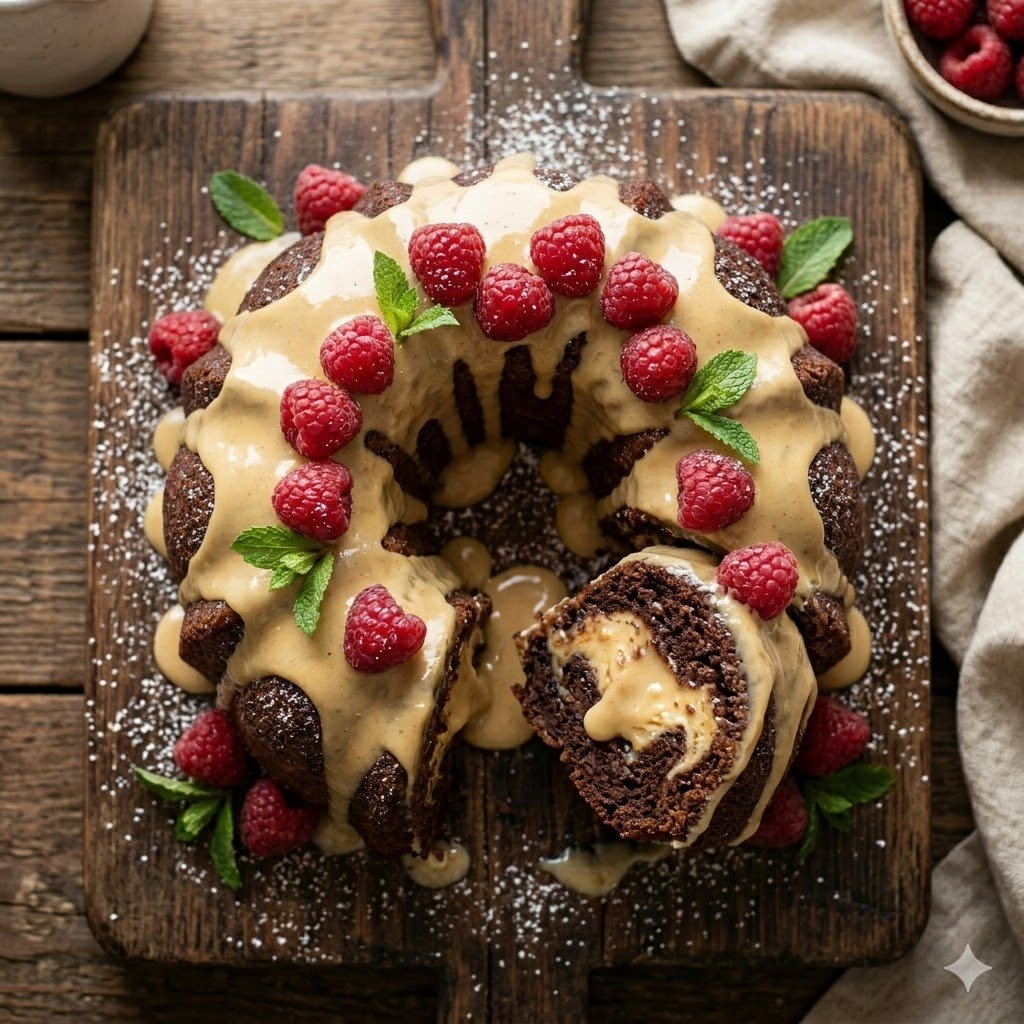
Furthermore, this specific recipe features a hidden peanut butter cheesecake tunnel baked right into the center. 🤤 When you slice into the dark chocolate crumb, you reveal a thick, gooey ring of peanut butter magic. IMO, hiding surprises inside desserts automatically makes you look like a highly trained professional pastry chef.
Americans obsess over peanut butter cups, and this cake perfectly scales that beloved candy up into a gorgeous centerpiece. 🇺🇸 You get the dense, satisfying crumb of a traditional pound cake alongside an insanely gooey, butter-soaked filling.
The Secret to a Flawless Pan Release
Nothing crushes your soul quite like a beautiful cake permanently glued to your expensive metal pan. 💔 Standard non-stick cooking sprays often fail miserably when dealing with heavy batters. You must aggressively prep your pan to ensure a flawless, clean release.
First, take a silicone pastry brush and paint softened butter into every single tiny crevice of the pan. 🧈 Next, dust the entire inside heavily with cocoa powder instead of standard white flour. White flour leaves an ugly, dusty crust on your beautiful dark cake :/
The cocoa powder blends seamlessly into the chocolate batter and guarantees the cake slides right out. Tap the pan upside down over your sink to remove any large clumps before you add the batter.
Gather Your Core Ingredients
Great bakers always organize their workspace before turning on the oven. 🥣 Grab your measuring cups and let’s assemble exactly what you need for your [ Chocolate Peanut Butter Bundt Cake ]. This precise recipe yields enough rich cake to feed twelve hungry guests.
The Dark Chocolate Cake Batter
- 2 cups all-purpose flour (spooned and leveled)
- 3/4 cup premium Dutch-processed cocoa powder
- 1 teaspoon baking soda
- 1/2 teaspoon baking powder
- 1 teaspoon kosher salt
- 1 cup (2 sticks) unsalted butter, softened to room temperature
- 1 1/2 cups granulated white sugar
- 1/2 cup packed light brown sugar
- 4 large eggs, at room temperature
- 1 tablespoon pure vanilla extract
- 1 cup full-fat buttermilk, at room temperature
The Peanut Butter Cheesecake Tunnel
- 8 ounces full-fat cream cheese, softened
- 3/4 cup creamy commercial peanut butter (do not use oily natural peanut butter)
- 1/4 cup granulated white sugar
- 1 large egg
- 1 teaspoon pure vanilla extract
The Epic Peanut Butter Glaze
- 1/2 cup creamy peanut butter
- 3 tablespoons whole milk
- 1 cup powdered sugar
- 1/2 teaspoon pure vanilla extract
Step-by-Step Baking Instructions
Preheat your oven to a steady 350°F (175°C) right now. 🌡️ Put on your favorite apron, clear your kitchen counters, and follow these active steps strictly to build your magnificent dessert.
1. Mix the Dry Chocolate Components
Grab a medium-sized mixing bowl. Whisk your flour, cocoa powder, baking soda, baking powder, and kosher salt together vigorously. 🥣 Sifting the cocoa powder prevents hard, bitter lumps from ruining your smooth batter. Set this bowl aside for a moment.
2. Cream the Butter and Sugars
Place your softened butter, white sugar, and brown sugar directly into the bowl of your stand mixer. Beat the ingredients on high speed for exactly three minutes. 🌪️ You want the mixture to look incredibly pale, fluffy, and light. This crucial step physically forces tiny air bubbles into the fat, giving your heavy cake a beautiful lift.
3. Finish the Chocolate Batter
Crack your room-temperature eggs into the fluffy butter mixture one at a single time. Beat the batter well after every single egg addition. 🥚 Pour your vanilla extract directly into the bowl and mix it briefly.
Now, alternate adding your dry ingredients and your buttermilk to the main batter. Start with one-third of the flour, mix gently, then add half the buttermilk. Repeat this process, and always finish with the final addition of flour. Stop the mixer the exact second you see the last streak of flour disappear! 🛑 Overmixing develops the gluten too much and creates a tough, rubbery cake.
4. Create the Peanut Butter Filling
Grab a completely clean mixing bowl for your cheesecake tunnel. Beat the softened cream cheese and creamy peanut butter together until they look completely smooth. 🥜 Add the sugar, egg, and vanilla extract. Whip the mixture for one minute until it looks exactly like thick, rich pudding.
5. Assemble and Bake
Pour exactly half of your chocolate batter into your heavily greased bundt pan. Use a metal spoon to carve a shallow trench directly in the center of the wet batter. 🥄 Spoon your rich peanut butter filling straight into that trench. Make absolutely sure the peanut butter filling does not touch the metal edges of the pan!
Cover the filling entirely with your remaining chocolate batter. Smooth the top with a rubber spatula. 🍰 Slide the heavy pan onto the middle rack of your hot oven. Bake the cake for exactly 55 to 65 minutes. A wooden skewer inserted near the edge should come out clean.
Applying the Signature Glaze
You must let the cake cool inside the hot metal pan for exactly ten minutes before you flip it. Place a wire rack over the pan and invert the whole thing carefully. The cake will drop right out! Let the cake cool completely to room temperature. ⏱️ If you pour glaze over a hot cake, the sugar melts directly into a sad, invisible puddle.
While the cake cools, whisk your creamy peanut butter, whole milk, powdered sugar, and vanilla together in a small bowl. 🥣 You want a thick, highly pourable consistency. If the glaze looks too stiff, add one more teaspoon of milk.
Drizzle the heavy glaze aggressively back and forth over the cooled cake. Let the sweet peanut butter drip naturally and beautifully down the intricate sides of the chocolate sponge. 🍯
Styling Your Cake for the Perfect Photo
You just baked an absolute masterpiece, so you need to present it properly to your audience. I know exactly how you can make this cake stop people mid-scroll online. 📸 You want to capture a cinematic close-up layout that makes the viewer drool instantly.
Slice the cake cleanly to reveal that stunning, thick peanut butter center contrasting against the dark chocolate. Set your camera to shoot in an ultra-realistic, vertical format. 📱 This specific aspect ratio completely dominates the screens on modern smartphones.
To create the ultimate Pinterest poster, add a thick black rectangle completely across the top of your image for your title text. Finally, highlight a bold buzzword like “Fudgy” or “Gooey” in a bright yellow accent color. 🌟 This precise visual format drives massive attention and saves from the American dessert-loving crowd!
Nutritional Information (Per Serving)
You probably assume a massive dessert packed with cream cheese and butter ruins your health goals entirely. While this treat definitely counts as a heavy indulgence, you can easily fit it into a balanced, happy weekend! 📊 Review the exact breakdown below for one standard slice (assuming you cut the cake into twelve equal pieces).
- Calories: 480 kcal 🔥
- Protein: 9g 💪
- Carbohydrates: 52g 🍞
- Fat: 28g 🥑
- Dietary Fiber: 3g 🌾
The peanut butter and eggs actually provide a solid dose of protein. You completely satisfy your wildest chocolate cravings using real, recognizable whole foods, successfully avoiding harsh commercial preservatives.
Storing Your Decadent Leftovers
If your friends somehow leave leftover slices behind, consider yourself an extremely lucky individual. 🧊 Because this specific recipe contains a perishable cream cheese filling, you absolutely must store the cake in the refrigerator at all times.
Place the remaining cake safely inside an airtight plastic dome, or wrap the individual slices tightly in plastic wrap. The cake stays incredibly moist and delicious for up to four full days.
FYI, eating a cold slice straight out of the fridge tastes absolutely incredible. The cold temperature turns the peanut butter filling into a dense, snappy fudge layer. 🥶
You can also freeze this cake effortlessly. Wrap individual slices tightly in plastic wrap, drop them into a heavy-duty freezer bag, and store them for up to three months. When a sudden sugar craving strikes, just pull a slice out and let it thaw on the counter for an hour.
The Final Bite
The [ Chocolate Peanut Butter Bundt Cake ] completely upgrades the standard dessert table. You combine rich dark chocolate, creamy peanut butter, and an effortless pan technique to create an unforgettable culinary experience. 💯
The entire baking process requires basic, accessible ingredients, but it yields maximum flavor rewards for everyone lucky enough to grab a fork. You will permanently ditch those dry, boring box mixes once you taste this homemade, intense perfection. 🙂
Are you ready to grab your mixing bowls and build this legendary dessert tonight? Start softening your butter, and let me know if you want me to generate an easy homemade vanilla bean ice cream recipe to serve right alongside it!


![Boston Cream Pie Cake ]](https://yourmagicspice.com/wp-content/uploads/2026/03/unnamed-5-120x86.jpg)