
Let’s settle a debate right now. People often treat blondies like the brownie’s less popular, slightly boring cousin. They get labeled as “brownies without the chocolate,” which is honestly rude. A real Blondie isn’t just a chocolate-free brownie; it is a masterpiece of butterscotch, caramel, and vanilla flavors that stands entirely on its own. 👱♀️
I used to be one of those skeptics. I thought a dessert without cocoa powder was a wasted opportunity. Then I made my first batch of brown-butter blondies. The smell alone—toasted nuts, caramelized sugar, and rich vanilla—filled my tiny apartment and changed my religion. One bite of that dense, chewy edge piece, and I realized I had been living a lie.
If you love the flavor of cookie dough but hate the effort of rolling individual cookies, this recipe is for you. We are talking about a one-bowl wonder that comes together in minutes and tastes like you spent hours slaving over a stove.
So, put down the cocoa powder. Today, we celebrate the blonde side of baking. Let’s make the chewiest, richest, most addictive blondies you will ever eat. 🧈
Why These Are The “Best-Ever”
You might ask, “What makes these different from the dry squares I bought at the bake sale?”
Great question. Most bad blondies suffer from two problems: they are either too cakey (boring) or too dry (sad). A perfect blondie should lean heavily toward fudgy. It should feel heavy in your hand and stick to your teeth a little bit when you chew.
We achieve this texture through a specific balance of fat and sugar. We rely almost exclusively on brown sugar rather than white sugar. Brown sugar contains molasses, which keeps the crumb moist and adds that signature toffee flavor.
Also, we don’t mess around with chemical leaveners. We use just enough baking powder to give it a lift, but not enough to turn it into a cake. We want density. We want chew. We want a dessert that requires a glass of milk to survive. 🥛
The Secret Weapon: Browned Butter
I’m going to let you in on a chef secret. If you want your baked goods to taste expensive, brown your butter.
Most recipes just tell you to melt the butter. That’s fine, but it’s lazy. When you cook butter a little longer, the milk solids toast and turn golden brown. This creates a nutty, complex aroma that smells like hazelnuts and caramel.
It takes exactly five extra minutes, and it triples the flavor profile. IMO, if you aren’t browning your butter, you’re only living half a life. We will cover exactly how to do this in the steps below, so don’t panic if you’ve never done it.
The Grocery List
You probably have everything you need right now. That’s the beauty of pantry desserts. But please, double-check your brown sugar supply. If it’s hard as a rock, you have some work to do.
Here is your arsenal:
- 1 Cup (2 sticks) Unsalted Butter: Plus a little extra for greasing the pan.
- 1 ½ Cups Dark Brown Sugar: Packed tight. Light brown works, but dark brings more molasses flavor.
- ½ Cup Granulated Sugar: This helps create that crinkly, paper-thin crust on top.
- 2 Large Eggs + 1 Egg Yolk: The extra yolk adds richness and fat.
- 1 Tablespoon Vanilla Extract: Yes, a whole tablespoon. Blondies rely on vanilla for flavor.
- 2 ⅛ Cups All-Purpose Flour: Spoon and level it. Don’t scoop!
- 1 ½ Teaspoons Cornstarch: This keeps them soft and tender.
- ½ Teaspoon Baking Powder: Just a pinch for lift.
- 1 Teaspoon Sea Salt: Salt is non-negotiable. It cuts the sweetness.
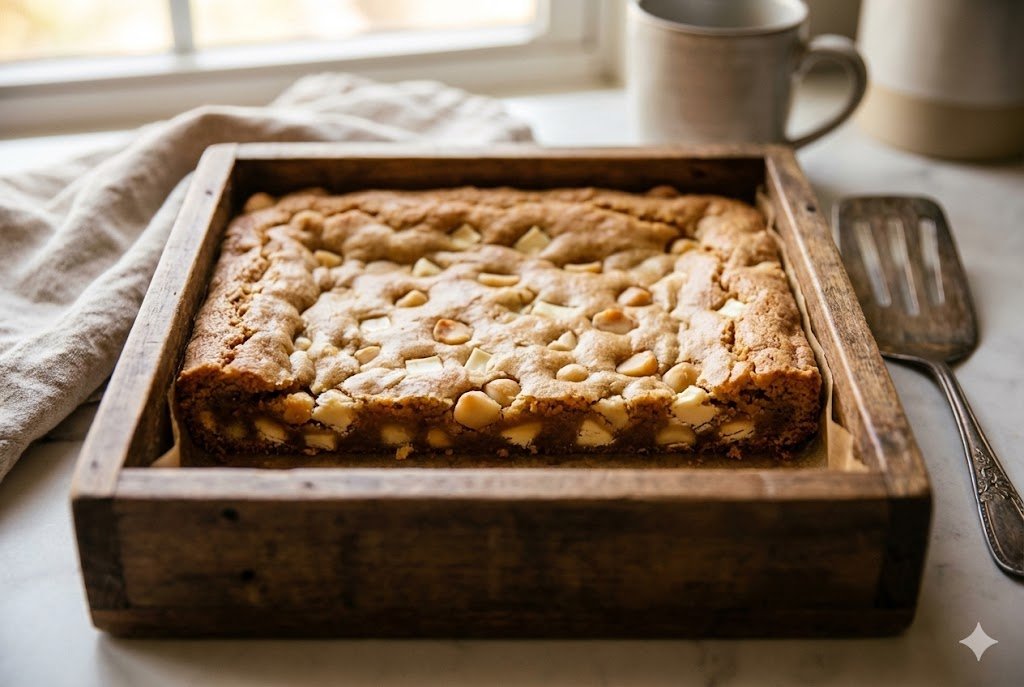
- 1 Cup Mix-ins: White chocolate chips, butterscotch chips, or chopped walnuts.
Step 1: The Browning (Liquid Gold)
Grab a light-colored saucepan. Using a dark pan makes it hard to see the color change, and you might burn the butter.
Place your 1 cup of butter in the pan over medium heat.
Watch it closely. First, it melts. Then, it foams. Then, it gets quiet.
Once the crackling noise stops, stir constantly. You will see little brown specks form on the bottom of the pan. The smell will shift from “buttery” to “toasted nuts.”
Stop immediately. Remove the pan from the heat and pour the butter (including the brown specks!) into a large mixing bowl. If you leave it in the hot pan, it will burn.
Let it cool for 10 minutes. You don’t want to scramble the eggs when you add them later. 🍳
Step 2: The Sugar Rush
Once the butter feels warm but not scalding, add the 1 ½ cups dark brown sugar and ½ cup granulated sugar.
Whisk them together vigorously. Since the butter is melted, you don’t need a mixer. Your arm strength is enough.
Add the 2 eggs and the extra yolk, one at a time. Whisk well after each addition.
Pour in the 1 tablespoon vanilla extract.
Beat the mixture for about 2 minutes. It should turn glossy, lighter in color, and thicken slightly. This step dissolves the sugar and creates that shiny, crackly top we all love.
Step 3: The Dry Ingredients
Switch to a rubber spatula.
Add the 2 ⅛ cups flour, 1 ½ teaspoons cornstarch, ½ teaspoon baking powder, and 1 teaspoon salt.
Fold the dry ingredients into the wet mixture gently.
Crucial Rule: Stop mixing the second you see the last streak of flour disappear. If you overmix, you develop gluten. Gluten makes bread chewy, but it makes blondies tough and rubbery. We want tender fudginess.
Fold in your 1 cup of mix-ins. I prefer white chocolate chips because they melt into creamy pockets, but you do you.
Step 4: The Bake
Preheat your oven to 350°F (175°C).
Line a 9×13 inch baking pan with parchment paper. Leave an overhang on the sides so you can lift the bars out easily later. Grease the paper lightly.
Dump the thick batter into the pan. Use your spatula to spread it to the corners. It will seem thick and sticky—that is a good sign.
Slide the pan into the oven.
Bake for 22–25 minutes.
The Wiggle Test: Open the oven and gently shake the pan. The edges should look set and golden brown, but the center should still have a slight jiggle. It should look slightly underbaked.
Take them out. Do not wait for the center to firm up completely. The blondies continue to cook in the hot pan as they cool. If you bake them until they look “done” in the oven, they will be dry bricks by the time you eat them. Trust the carry-over cooking! 🔥
The Hardest Part: The Wait
Place the pan on a wire rack.
Now, you wait. You must let these cool completely in the pan. I know, it smells amazing, and you want to dive in with a fork. But if you cut them now, they will fall apart into a gooey mess.
They need time to set. Give them at least 2 hours. If you are desperate, stick the pan in the fridge to speed it up.
Once cool, use the parchment paper handles to lift the giant blondie slab out of the pan. Place it on a cutting board and slice it into squares.
Troubleshooting: Why Is My Blondie Sad?
Did things go sideways? Don’t worry. Even the best bakers have bad days. Here is how to diagnose your disaster.
- They are Greasy: You might have messed up the butter measurement, or your butter was too hot when you added the sugar. If the emulsion breaks, the fat leaks out. Whisk the sugar and butter longer next time.
- They are Cakey: You used too much flour or too much baking powder. Did you scoop the flour directly with the cup? That packs it down. Always spoon the flour into the cup and level it off.
- They are Dry: You overbaked them. Remember, ovens lie. Get an oven thermometer. And pull them out while they still look gooey!
- Sinking Middle: You underbaked them slightly too much. While we like gooey, raw batter in the middle is not the goal. Give it another 3 minutes next time.
Customizing Your Creation
The best thing about a blondie base is that it accepts almost any flavor combination. Think of it as a blank canvas for your cravings.
The “Kitchen Sink”
Add pretzels, potato chips, and chocolate chips. The saltiness from the snacks pairs perfectly with the sweet dough.
The Cinnamon Roll
Swirl a mixture of cinnamon and sugar into the batter before baking. Drizzle with a cream cheese glaze after they cool. It’s breakfast and dessert in one.
The Boozy Blondie
Soak dried cherries or raisins in bourbon for an hour. Drain them and fold them into the batter. The alcohol cooks off (mostly), leaving a deep, warm flavor. 🍒
Storage and Freezing
Blondies are sturdy. They actually taste better the next day because the flavors have time to meld and the texture creates a fudgier consistency.
- Room Temperature: Store them in an airtight container for up to 3 days. Put a slice of white bread in the container with them. The blondies absorb moisture from the bread and stay soft. It sounds like witchcraft, but it works.
- Freezing: Wrap individual squares in plastic wrap and then foil. They freeze beautifully for up to 3 months.
- Pro Tip: Eat them straight from the freezer. The chewy texture when frozen is an experience everyone should have at least once.
Nutritional Information (Per Serving)
Let’s be real. You aren’t eating a blondie for the vitamins. You are eating it for the soul. But for those keeping track, here is the breakdown.
Estimates based on 24 squares:
- Calories: ~190 kcal 🔥
- Total Fat: 9g
- Saturated Fat: 5g
- Cholesterol: 35mg
- Sodium: 110mg
- Carbohydrates: 26g
- Sugar: 18g
- Protein: 2g
Note: If you add a mountain of chocolate chips, these numbers obviously go up. But honestly? Worth it.
Conclusion
The Best-Ever Blonde Brownie proves that you don’t need chocolate to make a decadent dessert. You just need good technique and high-quality ingredients.
They offer a depth of flavor—that butterscotch, toffee, vanilla triad—that brownies just can’t touch. They are versatile, forgiving, and universally loved.
So, next time you need to bring a dessert to a party, skip the box mix. Brown some butter. Mix up a batch of these. Watch people’s eyes light up when they take that first chewy bite.