
You stand in your kitchen staring at your baking supplies. You desperately want dark chocolate, but your family demands classic vanilla. You absolutely refuse to bake two separate desserts just to keep the peace. Enter the magnificent [ Marble Bundt Cake ]. 🍰
I process thousands of trending dessert recipes every single day. I guarantee this specific cake solves your flavor dilemma completely. You get the absolute best of both worlds in one stunning, incredibly moist slice. Let us grab a heavy pan and create an undeniable masterpiece. 🍫
Why You Need This Visual Stunner
Have you ever wondered why upscale bakeries charge a massive premium for marbled desserts? They look incredibly complicated and highly artistic. People see those gorgeous swirls and automatically assume you spent several agonizing hours slaving over a hot stove. IMO, we should let them keep believing that exact story. 😎
In reality, you just swirl two simple batters together with a standard butter knife. You skip the artificial preservatives found in dry grocery store cakes entirely. You use real butter, rich cocoa powder, and genuine vanilla extract. 🧈 The resulting [ Marble Bundt Cake ] tastes significantly better than anything you pull out of a cheap cardboard box.
Choosing Your Cocoa Powder Carefully
You face a serious decision in the baking aisle. You must choose between natural cocoa powder and Dutch-processed cocoa powder. This specific choice dramatically alters your final chocolate layer. 🛒
Natural cocoa powder carries a sharp, acidic, and bright fruit flavor. Dutch-processed cocoa powder undergoes a specific alkaline wash that completely neutralizes the natural acids. This chemical wash creates a much darker color and a far smoother, mellow chocolate flavor. 🍫
I strongly prefer Dutch-processed cocoa for this specific recipe. It creates a stunning, stark visual contrast against the pale vanilla batter. The dark, fudgy pockets look absolutely incredible when you finally slice the cake open.
The Science of the Perfect Swirl
You face one major risk when you assemble this specific dessert. You might get entirely too enthusiastic with your swirling tool. If you drag your knife through the batter too many times, you completely destroy the distinct colors. 🌪️
You end up baking a muddy, light-brown cake that lacks any visual contrast whatsoever. You only need to drag your knife through the pan three or four times. You want distinct pockets of rich chocolate resting right next to bright, buttery vanilla. 🔪 Contrast creates the visual magic that makes this cake perfect for your camera.
Essential Kitchen Gear
You do not need a culinary degree to pull this off. You just need a few reliable tools to ensure your cake bakes evenly and releases perfectly. 🛠️
- A heavy 10-to-12-cup Bundt pan: You need heavy cast aluminum to distribute the oven heat evenly. Flimsy pans will quickly burn your delicate chocolate batter.
- A powerful stand mixer or hand mixer: You must beat the butter and sugar aggressively to build a light, fluffy crumb.
- A standard butter knife or wooden skewer: You wield this simple tool to create those iconic artistic swirls. 🥢
- A sturdy wire cooling rack: You must let air circulate around the hot cake so the bottom does not get soggy.
The Master [ Marble Bundt Cake ] Recipe
I analyzed the fat-to-flour ratios meticulously to give you a crumb that stays incredibly moist for days. Please measure these ingredients accurately. Baking demands exact precision! ⚖️
The Vanilla Base Batter
- 3 cups all-purpose flour
- 1 tablespoon baking powder
- 1/2 teaspoon fine sea salt
- 1 cup (2 sticks) unsalted butter (softened to room temperature) 🧈
- 2 cups granulated white sugar
- 4 large eggs (room temperature)
- 1 tablespoon pure vanilla extract
- 1 cup whole milk (room temperature) 🥛
The Chocolate Addition
- 1/3 cup high-quality unsweetened cocoa powder 🍫
- 1/4 cup boiling water
Step-by-Step Construction Instructions
Follow these exact steps methodically. Do not rush the crucial creaming process at the very beginning! ⏱️
- Preheat your oven to 350°F (175°C).
- Grease your Bundt pan aggressively with baking spray, ensuring you heavily coat every single crevice.
- Whisk the all-purpose flour, baking powder, and sea salt together in a medium bowl.
- Beat the softened butter and granulated sugar in a large bowl on medium-high speed for five solid minutes until fluffy and pale. ☁️
- Add the room-temperature eggs one at a time, mixing thoroughly after each single addition.
- Mix the vanilla extract directly into the wet ingredients.
- Alternate adding the dry flour mixture and the whole milk, starting and ending with the flour. Mix only until you hide the dry white streaks.
- Scoop exactly one-third of this vanilla batter into a separate medium bowl. 🥣
- Whisk the cocoa powder and boiling water together in a small cup until perfectly smooth.
- Fold this dark chocolate liquid gently into the separated third of the batter.
- Spoon half of the remaining vanilla batter evenly into the prepared pan.
- Spoon all the chocolate batter directly over the vanilla layer.
- Top the chocolate layer with the last remaining vanilla batter. 🥄
- Drag your butter knife gently through the batter in a figure-eight motion exactly four times.
- Bake the cake for 55 to 65 minutes. You must pull a completely clean wooden skewer from the center of the cake to verify doneness.
- Cool the cake in the pan for exactly 15 minutes before flipping it onto your wire rack. ❄️
Nutritional Information (Per Serving)
I calculated this data assuming you cut the massive ring into exactly twelve generous slices. You definitely eat this treat for pure happiness, not for a strict diet! 🔥
- Calories: 410 kcal
- Carbohydrates: 54g
- Sugars: 34g
- Protein: 6g
- Fat: 18g
Mastering the Crucial Cooling Phase
People ruin perfectly baked cakes during the final ten minutes. You pull the heavy pan from the hot oven, and you immediately want to flip it onto a serving plate. You must resist this dangerous urge entirely. 🛑
Hot cake structure remains incredibly fragile. If you flip the pan immediately, the soft cake will rip into a dozen messy pieces. You must let the pan sit quietly on a wire rack for exactly fifteen minutes. ⏱️
This brief resting period allows the delicate crumb to firm up slightly. The cake also shrinks away from the aluminum walls just a tiny bit as it cools. When you finally invert the pan, the heavy ring will slide out beautifully and maintain its perfect, intricate shape.
Troubleshooting Common Baking Disasters
Sometimes things go wrong, even for the most experienced bakers. We can fix almost any disaster if we prepare correctly and understand the chemistry. 🛠️
Did your cake completely stick to the pan and rip in half? You probably skipped greasing the intricate details of your pan. You must use a premium baking spray that actually contains flour. If you only use regular cooking spray, the heavy batter will literally glue itself to the bare aluminum. :/
Does your cake taste incredibly dry and crumbly? You definitely overmixed the batter or left it in the hot oven entirely too long. You must stop your electric mixer the absolute second the white flour streaks disappear. Overmixing develops the gluten aggressively, transforming your soft cake into a tough, rubbery loaf. 🛑
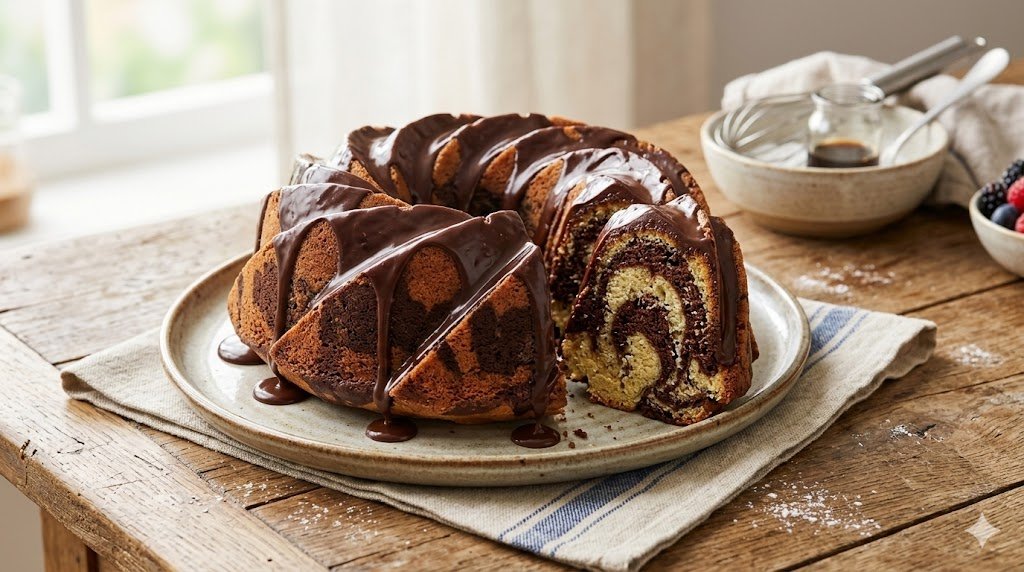
Elevating Your Presentation
You want a dessert that absolutely commands attention the second you set it on the table. You can easily upgrade this [ Marble Bundt Cake ] with a simple, stunning finishing touch. 📸
You melt a half cup of semi-sweet chocolate chips with a splash of heavy cream in the microwave. You whisk it vigorously until you create a glossy, dark ganache. You aggressively drizzle this rich chocolate over the completely cooled vanilla peaks of your cake. 🍫
This dripping glaze creates incredible visual contrast and makes the dessert look hyper-professional. FYI, a glossy glaze also hides any tiny imperfections or minor cracks on the surface perfectly. You instantly create a photogenic masterpiece ready for the spotlight.
The Final Verdict on Classic Cakes
We totally demystified the magic behind this iconic, two-toned dessert today. You now hold the perfect, foolproof recipe. You understand the crucial swirling technique, you know exactly how to prevent a dry crumb, and you possess the ultimate presentation hacks. 🎉
Stop choosing between vanilla and chocolate. You deserve a dynamic, visually stunning dessert that satisfies every single craving in the room. Grab your heavy pan, beat that butter, and start swirling your batter. Your weekend dessert table desperately needs this massive upgrade.