
Let’s be honest. Camping is great in theory, but in practice? It involves mosquitoes, sleeping on rocks, and smelling like woodsmoke for three business days. We endure all of that for one specific reward: the s’more. But what if I told you that you could achieve that gooey, chocolatey, marshmallow perfection without sleeping in a tent? ⛺
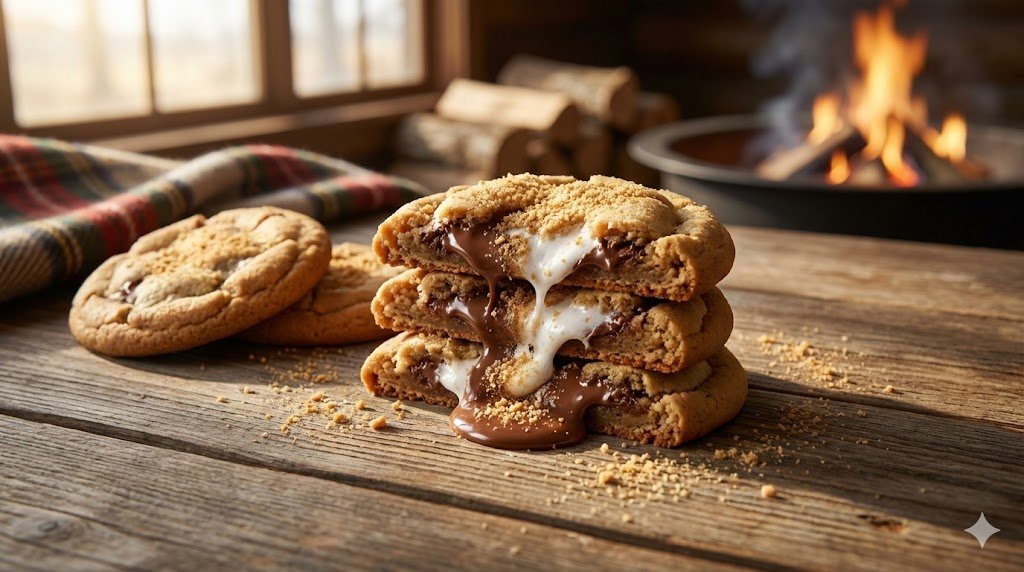
Enter the S’mores Stuffed Cookie. This isn’t just a cookie; it’s an architectural marvel. We take a brown sugar cookie dough, infuse it with graham cracker crumbs, and then physically stuff a marshmallow and a piece of chocolate inside.
I remember my first attempt at these. I didn’t seal the dough properly, and my oven looked like the Stay Puft Marshmallow Man exploded inside it. It was a tragedy. But after a few sticky experiments, I cracked the code. Now, you get all the campfire nostalgia with none of the bug bites. Let’s get baking. 🔥
Why These Cookies Beat the Real Thing
You might ask, “Why not just microwave a s’more?” First of all, have some self-respect. Second, the texture profile here destroys a standard s’more.
A traditional s’more is a structural nightmare. The cracker breaks, the chocolate stays hard, and the marshmallow burns your tongue. These cookies solve every single one of those problems. The dough stays soft and chewy, the chocolate melts perfectly alongside the marshmallow, and the graham cracker crumbs provide that signature flavor without the mess. 🍪
Plus, you look like a baking wizard when you break one open. The marshmallow pull creates a visual moment that practically demands an Instagram post. IMO, these are the ultimate party trick.
The Grocery Haul: Specifics Matter
We don’t need fancy ingredients, but we need the right ingredients. Don’t swap things out randomly, or you’ll end up with a sad, flat puddle.
The Dry Goods
- 1 ½ cups All-Purpose Flour: Spoon and level it. Don’t scoop directly from the bag, or you’ll pack the flour and make a dry cookie.
- 1 ½ cups Graham Cracker Crumbs: You can buy a box of crumbs, or just smash about 10–12 full sheets in a ziplock bag. I prefer smashing them; it’s excellent stress relief. 🔨
- 1 teaspoon Baking Soda: This gives the lift.
- ½ teaspoon Salt: Essential to cut the sweetness.
- 1 tablespoon Cornstarch: Secret weapon alert. This keeps the cookies soft and pillowy.
The Wet Goods
- 1 cup (2 sticks) Unsalted Butter: Room temperature. If you use melted butter, the cookies will spread too much.
- ¾ cup Light Brown Sugar: Packed tight. This adds the chewiness.
- ½ cup Granulated Sugar: For crispy edges.
- 2 Large Eggs: Room temperature mixes best.
- 2 teaspoons Vanilla Extract: Measure with your heart.
The “Stuffing”
- 1 bag Large Marshmallows: Do not use mini marshmallows for the center. They disappear. Use the big guys.
- 2 Hershey’s Milk Chocolate Bars: Break them into rectangles. You can use semi-sweet chips, but milk chocolate bars give that authentic campfire taste. 🍫
Step 1: The Crumble and The Mix
Get your oven preheated to 350°F (175°C), but only if you plan to bake immediately (more on chilling later). Line two large baking sheets with parchment paper. Do not skip the parchment paper. Marshmallows stick to metal like superglue.
First, smash your graham crackers if you haven’t already. You want a fine sand texture.
In a medium bowl, whisk together the flour, graham cracker crumbs, baking soda, cornstarch, and salt. Set this aside. This creates your “dry team.”
Step 2: Creaming the Butter
Grab your stand mixer or a large bowl with a hand mixer. Throw in the softened butter, brown sugar, and granulated sugar.
Beat this mixture on medium-high speed for about 3 minutes. You want it light, fluffy, and pale. Don’t rush this step. This process forces air into the dough, which prevents the cookies from turning into dense rocks. 🥣
Add the eggs one at a time, mixing well after each crack. Pour in the vanilla. Scrape down the sides of the bowl. Seriously, scrape the bowl. There is always a chunk of unmixed butter hiding at the bottom trying to sabotage you. :/
Step 3: Making the Dough
Turn the mixer to low speed. Slowly pour in the “dry team” mixture.
Stop mixing the second the flour disappears. Over-mixing develops gluten. Gluten makes bread chewy, but it makes cookies tough. We want tender, not tough.
At this point, you can fold in a handful of semi-sweet chocolate chips if you want extra chocolate in the dough itself. I usually add about ½ cup of chips just to be safe. You can never have too much chocolate. 🍫
Step 4: The Architecture of Stuffing
This is the most critical part of the recipe. If you mess this up, the marshmallow leaks out, caramelizes, and burns. We need to build a vault.
- Scoop: Take a large scoop of dough (about 3 tablespoons).
- Flatten: Flatten the dough into a pancake in the palm of your hand.
- Place: Place one large marshmallow and one rectangle of chocolate in the center of the pancake.
- Seal: Fold the edges of the dough up and around the marshmallow. Pinch the seams tightly. Roll it gently between your hands to smooth it out.
Crucial Check: Look for any gaps. If you see white marshmallow peeking through, patch it with more dough. The marshmallow expands violently in the heat. Any weak point will burst. 💥
Step 5: The Big Chill (Optional but Recommended)
Here is a pro tip that separates the amateurs from the masters. Chill the dough balls.
Place your stuffed dough balls on the baking sheet and pop them in the fridge for 30 minutes.
Why? Cold dough spreads slower. This gives the marshmallow time to melt inside the cookie before the cookie flattens out completely. If you bake warm dough, you often end up with a flat cookie and a puddle of marshmallow on the side. Patience pays off. ❄️
Step 6: The Bake
Space the cookies at least 2 inches apart on the baking sheet. They grow.
Bake at 350°F (175°C) for 10 to 12 minutes.
Watch them like a hawk after the 10-minute mark. You want the edges to turn golden brown. The center might look slightly underbaked. That is okay. Pull them out.
Let them cool on the baking sheet for at least 10 minutes. They are fragile when hot. If you try to move them now, they will fall apart, and you will cry.
While they are hot, press a few extra pieces of chocolate or graham cracker on top for aesthetic points. It lets people know exactly what they are about to eat. 🍪
Troubleshooting: My Cookie Exploded
So, you opened the oven and found a disaster. Let’s diagnose the crime scene.
- “The marshmallow vanished.” You probably used mini marshmallows or your oven was too hot. The marshmallow melted into the dough and disappeared. Use large marshmallows next time.
- “There is a sticky puddle everywhere.” You didn’t seal the dough tight enough. The marshmallow found an escape route. Next time, use a little more dough and pinch those seams like your life depends on it.
- “They are flat pancakes.” Your butter was melted, not softened. Or you skipped the chilling step. Structure relies on temperature!
Variations: Remixing the Classic
Once you master the vault technique, you can stuff these cookies with anything. Here are a few combos I love.
The Peanut Butter Lover
Swap the milk chocolate bar for a Reese’s Peanut Butter Cup. The saltiness of the peanut butter cuts through the sweet marshmallow perfectly. It’s intense, but worth it. 🥜
The “Nutella”
Freeze teaspoon-sized dollops of Nutella on parchment paper. Stuff the frozen Nutella ball inside the cookie along with the marshmallow. It creates a molten hazelnut core.
The Strawberry Shortcake
Use white chocolate instead of milk chocolate and throw some freeze-dried strawberries into the dough. It tastes like summer. 🍓
Nutritional Information (Per Serving)
Okay, look. We are stuffing candy inside a cookie inside a cracker crust. We aren’t doing this for the six-pack abs. But knowledge is power, right?
This recipe yields approximately 12 large cookies.
- Calories: ~380 kcal
- Total Fat: 16g
- Saturated Fat: 9g
- Carbohydrates: 58g
- Sugars: 35g
- Protein: 4g
Note: These numbers vary based on how huge your marshmallows are. Just enjoy the cookie and eat a salad tomorrow. 🥗
Storage: Keeping the Goo
If you somehow manage not to eat the entire batch in one sitting (a feat I have rarely accomplished), you need to store them right.
Place the cookies in an airtight container at room temperature. They stay fresh for about 3 to 4 days.
Pro Tip: If you want to recreate the “fresh out of the oven” experience on day 3, pop a cookie in the microwave for 10 seconds. The marshmallow re-melts, the chocolate gets gooey, and it tastes brand new.
Can you freeze them? Yes! Freeze the unbaked dough balls. When a craving hits, bake them straight from the freezer. Just add an extra 2 minutes to the baking time. Future You will thank Present You for this foresight. 🧊
Final Thoughts
You now possess the blueprint for the S’mores Stuffed Cookie. It brings the chaos of the campfire into the controlled environment of your kitchen.
There is something incredibly satisfying about watching someone take that first bite. Their eyes widen, they try to catch the stringy marshmallow, and they inevitably get chocolate on their face. It’s a bonding experience.
So, grab that bag of marshmallows. Smash those graham crackers. And prepare to become the most popular person at your next potluck.