
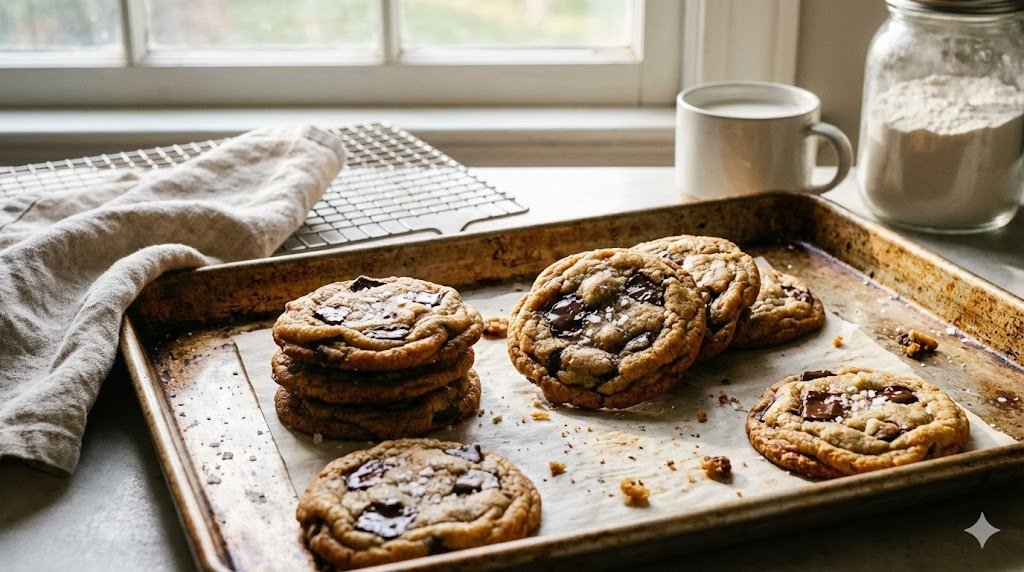
Let’s be honest with each other. We all have that one cookie recipe we memorized from the back of a yellow bag. It’s fine. It does the job. But “fine” doesn’t get you out of bed at midnight for a snack, does it? If you want a cookie that haunts your dreams (in a good way), you need to upgrade. You need Brown Butter Sea Salt Chocolate Chunk Cookies. 🍪
I remember the first time I browned butter. I thought I ruined it. It foamed up, hissed at me, and turned this dark amber color. I almost threw it out. But then the smell hit me—toasted hazelnuts and caramel. I poured that liquid gold into my dough, and my baking life changed forever. This isn’t just a cookie; it’s an experience. It’s nutty, deep, rich, and balanced by that sharp hit of flaky sea salt. 🧂
Ready to ruin all other cookies for yourself? Let’s get messy.
Why Brown Butter Changes Everything
You might ask, “Why go through the extra step of cooking the butter?” Valid question. Regular melted butter adds fat and moisture. Brown butter adds flavor.
When you cook butter past its melting point, you toast the milk solids. This creates a nutty, toffee-like aroma known as the Maillard reaction. It transforms a one-note sweet cookie into something complex and savory-sweet. It’s the difference between listening to a song on your phone speaker versus hearing it live in a stadium. You feel it. 🎸
Also, we use chunks, not chips. Chocolate chips contain stabilizers to help them keep their shape.1 We don’t want shape; we want puddles. We want glorious, messy pools of chocolate that coat your tongue. Trust me on this.
The Ingredients: Quality Matters Here
Since we rely on a few main flavors, buy the good stuff. Don’t use the dusty chocolate bar from last Halloween.
The Dry Team
- 2 ¼ cups (280g) All-Purpose Flour.
- 1 tsp Baking Soda.
- 1 tsp Kosher Salt (for the dough).
- Flaky Sea Salt (like Maldon) for sprinkling.2 Do not skip this!
The Wet Team
- 1 cup (2 sticks/227g) Unsalted Butter. (We will brown this). 🧈
- ½ cup (100g) Granulated White Sugar.
- 1 ½ cups (300g) Dark Brown Sugar, packed. (Dark brown sugar adds more moisture and molasses flavor than light brown).
- 2 tsp Vanilla Extract.
- 2 large Eggs, room temperature.
The Chocolate
- 8 oz (225g) Semi-Sweet or Dark Chocolate Bar (60-70% cocoa), roughly chopped.
Step-by-Step: Mastering the Brown Butter
This is the only “technical” part of the recipe. Don’t walk away to check Instagram. Butter burns faster than you think.
- Slice and Melt: Cut your butter into slices and toss them into a light-colored saucepan. (A light pan helps you see the color change).
- The Sizzle: Turn the heat to medium. The butter will melt and start to foam. It will crackle and pop—that’s the water evaporating. 💧
- The Silence: Suddenly, the popping will stop. The foam will subside slightly. Watch closely now.
- The Amber Turn: You will see brown specks form on the bottom of the pan. The liquid will turn a deep golden brown.
- The Smell: Once it smells intensely nutty, remove it from the heat immediately. Pour it into a large heat-proof bowl to stop the cooking. Let it cool for 10–15 minutes.
Mixing the Dough: No Mixer Needed
You don’t need a KitchenAid for this. A strong arm and a whisk work perfectly.
1. The Sugar Rush
Pour both the white and brown sugars into your slightly cooled brown butter. Whisk them vigorously for about 2 minutes. You want the mixture to look glossy and resemble wet sand. This step dissolves some of the sugar, which creates that crackly top we all love. ✨
2. Emulsify
Add the eggs and vanilla. Whisk again until the mixture thickens and lightens in color. It should fall off the whisk in a thick ribbon.
3. The Gentle Fold
Dump in your flour, baking soda, and kosher salt. Switch to a rubber spatula. Gently fold the dry ingredients into the wet.
- Crucial Tip: Stop mixing when you still see a few streaks of flour. Overmixing develops gluten, and gluten makes tough cookies.3 We want tender cookies.
4. The Chocolate Chunk Rain
Throw in your chopped chocolate. Fold just enough to distribute the pieces. Save a few big chunks to press on top of the dough balls later (for aesthetic purposes, obviously). 🍫
The Hardest Step: The Chill
I have bad news. You cannot bake these yet. If you bake warm brown butter dough, it spreads into a flat, greasy puddle.
Cover the bowl and refrigerate for at least 30 minutes. ideally overnight.
- Why? Chilling solidifies the fat. It also allows the flour to hydrate, leading to a chewy texture and deeper flavor. Think of it like marinating meat. The longer it sits, the better it tastes. FYI, waiting is torture, but it pays off. ⏳
Baking: The Final Countdown
- Preheat: Crank your oven to 350°F (175°C).4 Line two baking sheets with parchment paper.
- Scoop: Scoop large balls of dough (about 3 tablespoons each). Place them 2 inches apart.
- Bake: Pop them in the oven. Bake for 10–12 minutes.
- The Check: Pull them out when the edges look golden brown and crisp, but the centers still look soft and slightly underbaked. They will continue cooking on the hot tray. If they look fully done in the oven, you overbaked them.
- The Pan Bang (Optional): Want those crinkly edges? Lift the pan 4 inches off the counter and drop it flat. Bang! This collapses the center and pushes the chocolate out.
- The Sprinkle: While they are still hot and gooey, sprinkle a generous pinch of flaky sea salt on each cookie.
Nutritional Information (Per Cookie)
Let’s be real. You aren’t eating these for the vitamins. These are soul food. But for the sake of science, here is what you are consuming.
| Nutrient | Amount |
| Calories | ~290 kcal |
| Fat | 15g |
| Carbohydrates | 38g |
| Sugar | 26g |
| Protein | 3g |
Note: This assumes you make about 18 large cookies. If you eat three in a row (which I have definitely done), just triple the numbers and don’t look back. 🤷♂️
Why Chunks Beat Chips Every Time
Ever wondered why bakery cookies look better than homemade ones? It’s the chocolate. Chocolate chips contain ingredients designed to help them hold their shape under heat.5 That’s great for shipping, but bad for eating.
When you chop a bar of high-quality baking chocolate, you get three things:
- Big Chunks: These create molten pools.
- Shards: These melt into the dough, making every bite chocolatey.
- Dust: This marbles the dough, making it look professional.
IMO, once you chop, you never go back to chips. It’s a bit more work, but the payoff is massive. 🔪
Troubleshooting Your Batch
Even the best bakers have off days. Here is how to fix common disasters.
- The Flat Pancake: Your butter was too hot, or you didn’t chill the dough long enough. Next time, give it an hour in the fridge.
- The Burnt Bottom: You used a dark metal pan. Dark pans absorb more heat. Lower your oven temperature by 25°F or use a lighter pan.
- The Rock Hard Cookie: You overbaked it. Remember, take them out when they look underdone. They firm up as they cool.
- The Greasy Mess: You didn’t measure your flour correctly. Don’t scoop the flour with the cup; spoon it in and level it off.
Variations to Try
Feeling adventurous? Customize your dough.
- Espresso Hit: Add 1 teaspoon of espresso powder to the butter. Coffee amplifies chocolate flavor like crazy. ☕
- Nutty Crunch: Add ½ cup of toasted pecans or walnuts. The bitterness of walnuts pairs perfectly with the sweet brown sugar.
- Toffee Twist: Throw in some crushed toffee bits (Heath bar style) for extra crunch and caramel flavor.
Conclusion: Go Preheat Your Oven
There you have it. You now possess the secret knowledge of the Brown Butter Sea Salt Chocolate Chunk Cookie. You understand the power of toasted milk solids. You respect the chocolate chunk.
Making these cookies tells people you care. It says, “I didn’t just mix stuff together; I watched butter foam and sliced chocolate by hand for you.” Or, you know, you can just eat them all yourself while watching Netflix. I won’t judge.
So, go grab that butter. Your kitchen is about to smell better than it ever has. Happy baking! 🏠